- Reasons to use Git
- Get Git
- The Git shell
- Tell Git who you are
- Get help from Git
- Create a new local repository
- Status of your repository
- Working, staging and committing
- Stage to tell Git what to refer to
- Commit to make a snapshot of your work
- The commit message
- Removing files
- Renaming files
- Ignoring files
- Branch to isolate
- Compare your working directory
- Merge to include
- Remove or rename a branch
- Rewind your work
- Working with remotes to share with a team
- Clone a remote repository to local
- Push data to remote
- Pull data from remote
- The big picture
- Command reference
- Create new local repo
- Copy existing repo
- Status of repo
- Stage content
- Removing files which have not been staged
- Commit content
- See history of commits
- Remove file
- Rename file
- Ignore file
- See what branch you are on
- Create a branch
- Checkout a branch
- Compare changes
- Merge
- Rename a branch
- Delete a branch
- Activate an older commit
- Discard file changes
- Push to server
- Pull from server
- Tell Git who you are
- Display your Git config
- Edit your Git config file
- Configure your editor
- Let Git accept your self-signed certificate
- References
Reasons to use Git
Git will help you doing the following things with a computer:
Personal
- Keep track of file revisions when working iteratively (this is often referred to as version control).
- Safely experiment because you can always step back to the previous version.
- No need to give your files version indicating names, like essay_v1.txt, essay_v2.txt and so on.
- It doesn't play a role if you want to work on a single file or a multi-file project organized in multiple folders.
- Convert any file or folder structure into a project that is under version control.
- Have the advantage of powerful version control without the need to setup a server or creating an account somewhere.
- Work consistently on multiple different operating systems, like MacOS, Linux and Windows.
Team
- Share your work with others and keep track of their changes by enforcing the same set of rules for managing versions. This will work even with thousands of people on a big project, but also scales down nicely for a small team.
- When sharing your work with others, you can work on your local computer without being always connected to a shared repository, only synchronizing eventually.
- No central locking of files. All team members have their own working copy on their own computers which allows each of them to work independently.
Get Git
Git is free. You can get Git for any platform at git-scm.com/downloads.
No matter what platform you are using, all of the examples in this document are to be run from inside a command shell with access to Git.
Get Git on your Mac
I find it a little bit faster and more comfortable to use the GitHub Desktop Installer for setting up Git on either Mac or Windows.
On a Mac, after installation, fire up GitHub Desktop, open the Preferences screen, go to the advanced tab and activate Install Command Line Tools to have the Git shell on your Mac. If you are using GitHub Desktop the first time, you can either install the command line tools from the welcome screen of GitHub Desktop.
Though not mandatory, for an improved Git experience in the shell, I like to have the following configured:
- The credential helper to cache my username and password, so I don't have to provide it over and over again when using the https port while connecting to Git servers. See Caching Your Git Password for installation advice.
- Bash Git Completion for an improved command prompt and command completion with the tab key. Follow Install Bash Git Completion to get it set up (it includes a Git installation via homebrew, but you won't need that one if you already installed GitHub Desktop like mentioned before). In addition to the explanations given, put the following lines to your
.bash_profileto improve your command prompt:
export GIT_PS1_SHOWDIRTYSTATE=true
export GIT_PS1_SHOWUNTRACKEDFILES=true
PS1='\u@\h \W$(__git_ps1 " (%s)")\$ '
Get Git on Windows
On Windows, the installation of GitHub Desktop will bring Git and the GitHub Desktop Client on your machine. This all with minimal configuration effort for yourself. I think it's a good starting point for your Git experience on Windows.
The Git shell
You can use a slick GUI client on top of Git, like for example Tower on a Mac or the reduced GitHub Desktop. Sometimes things go faster and easier with a GUI client. Anyway, an advantage of the command shell is, it works the same on all platforms. What you learned here can be used anywhere. I assume it's not so bad to start at the bottom to understand the tool right.
Tell Git who you are
git config [--global] user.name ["your name or user name"]
git config [--global] user.email ["your email address"]
Use the --global option to tell Git that the given configuration will be the default for all of your projects on your computer. After these settings have been made, your user data will be added to your commits. When you then push commits to a shared server, your name and email address will also appear on that server.
Detect your configuration settings with git config --list.
Get help from Git
You can type git help <command> to get access to user documentation about the specified <command>. To only get short info about the command syntax, use git <command> -h.
Create a new local repository
Move to the folder which should contain your project cd /path/to/your/prj/ , then initialize the Git repository for the project with git init.
Status of your repository
When inside of a local Git repository git status will tell you what branch you are currently working on and give you an overview of untracked changes and outstanding commits.
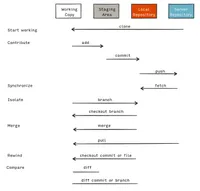
Working, staging and committing
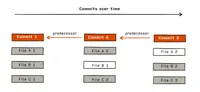
Versioning in Git is achieved by creating snapshots of your entire working directory. A snapshot is created with a commit. For files without changes, Git will maintain a reference to the previous snapshot. This means, each commit represents your entire working directory at that time, but stores only the files which have been changed. Technically speaking, Git maintains a directed acyclic graph of snapshots of your work.
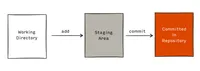
While you are working, Git divides your content into three main sections. Your working directory, your staging area (often referred to as index) and your committed work.
- Your working directory is merely the set of files and folders you operate on – your project.
- The staging area is the set of changes which should go into the next commit.
- Once you commit, Git will take the contents from the staging area and create a snapshot in the Git repository, which is then the committed revision of your project at the time of the commit.
Stage to tell Git what to refer to
To prepare a snapshot of your current work, which will be stored in the Git repository, call git add <pathspec>.
<pathspec> specifies the files to be put into the staging area (the index). Wildcards are allowed.
If a version of a file is not staged, Git doesn't know how to refer to that version of the file and therefore you can't commit it later on. Staged but uncommitted content remains only on your local computer and will not be sent to a remote repository somewhere else.
If you omit the <pathspec> , use git add --all which will ensure all untracked files in your current project are being added to your staging area.
The opposite of git add is git reset <pathspec>. With git reset you can un-stage contents.
If you created files or directories without staging them, and you want to get rid of them, use git clean [-ifd].
-i show what would be done and clean files interactively.
-f if the git config clean.requireForce false is not set, this option is needed to proceed with the command.
-d will also remove directories in addition to files.
Commit to make a snapshot of your work
You will commit very often, multiple times a day, sometimes within in minutes. It is the action you do most of the time when using Git.
Do not commit half-done, not-functioning work. Any commit should be a small solution for its own. As an example, a commit can contain the refactoring of a single method in your code or the rephrasing of a paragraph in a text document.
Contents which have been staged must be committed to produce a snapshot of your current work in the Git repository. Any commit is self-contained, it does not only reference your current changes but everything which makes up the state of your current project at the time you are committing. This is because each commit contains a pointer to its direct predecessor, the parent commit. Beginning at the most recent commit, the tip, the list of commits is a sequence pointing to the past, defining your entire project at the current time.
Commit with git commit [-a] [-m "your commit message"].
-a is a nice shorthand option even to stage content which has been modified or deleted without a previous git add command. New contents still need to be staged with the git add command. With -m "your commit message" you tell your co-workers and probably yourself why you made the commit.
An even shorter form of committing, in that case, is git commit -am "your commit message".
Here the option to stage modified and deleted contents and the option to provide a commit message are combined in one option -am. You can combine multiple options in a single one like here, the only restriction is that only the last option can take an argument, like the commit message.
If you don't specify a commit message when firing the commit command, an editor will be opened where you have to provide the commit message. You can configure the editor of your preference with git config --global core.editor <editor-name>.
help.github.com/articles/associating-text-editors-with-git provides a brief guide to setting up several editors. To see the currently configured editor, type git config [--global] core.editor.
Once you configured your preferred editor, you can not only write your commit messages by using it, you can also edit all of your configurations easily with the command git config [--global] --edit.
To see the history of commits use git log. The output of a git log can be filtered and formatted with git log [--oneline] [--pretty] [<branch-name>].
For example git log --oneline will display most recent commits organized into one single line per commit.
git log --oneline <branch-name> will display most recent commits in the specified branch, organized into one single line per commit.
A free formatting of the git log output can be achieved with git log --pretty="<your format string>"
A list of available formatting options is on git-scm.com/docs/pretty-formats.
The commit message
A git log of commit messages should give an idea of how the project has evolved. Each message explains what has been accomplished or changed with the commit. The message should describe a whole idea of completed work [Westby 2014]. Don't describe how the change was accomplished – that's in the code.
A properly formed commit subject line should complete the following sentence:
If applied, this commit will
<your commit subject line>
The commit messages reveal whether a committer is a good collaborator or not.
Because in the output of a git log is not much space to display text and we do not have time to read through many sentences to understand what a commit was about, as a rule of thumb, the subject of the commit message should contain one line and 50 or fewer characters. Start the subject with a capital letter and do not end with a period.
Use the imperative mood, which means "spoken or written as if giving a command or instruction." Examples:
- Repair css class assignment for git_hub image
- No underline for slide navigation
- Increase line height by a factor of 0.1
If more explanation is needed, let a blank line follow the subject and then write the body of the commit message, wrapped at 72 characters per line, as Git will not wrap text automatically. Explain why the commit was made, again, not how.
In other words, follow the seven rules of a great Git commit message [Beams 2014]:
- Use the imperative mood in the subject line
- Limit the subject to 50 characters
- Capitalize the subject line
- Do not end the subject line with a period
- Separate the subject from the body with a blank line
- Wrap the body at 72 characters
- Use the body to explain what and why vs. how
Removing files
To delete a file from the working copy and the staging index, use git rm <pathspec>.
<pathspec> describes the file or even files (wildcards allowed), which should be deleted. git rm will remove the file in your working copy and will stage the remove so that the removal can be committed in a subsequent commit. If you forgot to use git rm at first hand and instead removed the file with your usual remove command in the shell, the file will be removed from the working copy, but not from the staging index. In that case, you can even call git rm <pathspec> afterward, to have the file be removed from the index, as it is already removed from the file system.
Renaming files
If you rename a file in your command shell with mv a.txt b.txt , it will produce a similar situation as if you would remove a file with just the shell command rm a.txt and creating a new file b.txt. Git would still try to keep track of a.txt. To fix this, you would have to
git rm a.txt
git add b.txt
Or, use the suitable Git command right from the start: git mv a.txt b.txt which can be generalized to git mv <current-path> <new-path>
Ignoring files
If Git should ignore some files in your project, for example, because
- a process belonging to your project automatically creates the files,
- the files contain credentials or
- package managers anyway download the files,
you can specify patterns inside of the .gitignore file to exclude these from Git version control. Each pattern is one line in the .gitignore file. The .gitignore usually is in the root of your Git project.
An example of the patterns your .gitignore may contain
*.a
build/
doc/*.txt
doc/**/*.txt
!doc/todo.txt
The meaning of the patterns:
*.aignore files with extension.abuild/ignore all contents of thebuilddirectorydoc/*.txtignore all files with extension.txtinside of thedocdirectorydoc/**/*.txtignore all files with extension.txtinside of thedocdirectory and all sub-directories ofdoc!doc/todo.txtdo not ignoretodo.txt
The .gitignore file itself should be under version control – so be aware of not putting .gitignore as a pattern into the .gitignore file.
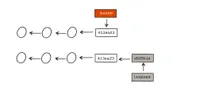
Branch to isolate
Any contents in Git must be in a branch. The first branch of a Git repository is the master branch. Technically it is a branch like all other branches, but conceptually it is the primary, stable version of whatever is stored in the repository.
A commit will always be done inside of a particular branch. But while commits point to the past, a branch is a concept for the future. A branch is a virtual copy of your project, where commits can be made freely in isolation from whatever else may happen in the repository. You would create a branch to experiment with some new feature inside of your project, to fix a bug or to do other things which you want to have separated from everything else until you have indeed found what you are after in your branch.
While you can have multiple branches in your repository, there is always exactly one working branch in your local repository, which is the one you are currently working on. This is what is in your working directory or working copy. Any commit you make will be against the working branch.
git branch <branch-name> [<commit>] will create a new branch for you. Choose a short descriptive branch name. The optional <commit> specifies a commit to start from. If you don't give the <commit> , the branch will be created from the latest commit in the current branch.
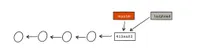
git branch <branch-name> will not make the newly created branch your current working copy; therefore your next commit would not be against the new branch. To make the new branch the active working copy, you need to git checkout <branch-name> after you have created your branch. Whatever you commit from that point on will be inside of your new branch and nowhere else.
Again, there is a shorthand command for creating a branch and making it the current working copy all at once: git checkout -b <branch-name> will create a new branch and make it the current working copy.
git branch [-a|-r] without any option this command will show you the current list of local branches with a * in front of the currently active branch. Local branches are the branches you are working on and where your commits go against. With -r the remote tracking branches will be shown. -a will show all local branches and all remote tracking branches.
Remote tracking branches are all branches from your remote server (please refer to Working with remotes to share with a team) which came with your most recent git fetch or git pull into your local repository (so they are called remote tracking, but indeed they are stored in your local repository). They are used to connect your work with a remote repository. Whenever you call get status and get a result like
Your branch is ahead of 'origin/<branch-name>' by 1 commit.
  (use "git push" to publish your local commits)
Git has figured out a difference between your local branch and its counterpart, the remote tracking branch.
Remote tracking branches are named origin/git checkout origin/<branch-name> – instead, do git checkout <branch-name> to make the remote tracking branch a local branch.
To see the history of commits in a branch-oriented tree format, use git log --graph --oneline.
The --graph option will produce the branch tree, and the --oneline option leads to each commit being displayed in a single line of the tree structure.
Compare your working directory
git diff will indicate the differences between your working directory and your staging area.
git diff [<branch-name or commit] compares your working directory with <branch-name or commit>.
git diff <older-commit> <newer-commit> will indicate the differences between the two commits.
I find myself now and then using one of the two options --stat or --color-words in conjunction with any of the above git diff commands.
--stat will display a little statistic of changed files with numbers of lines added and removed.
--color-words will indicate changes in files word by word, instead of line by line, which is the default.
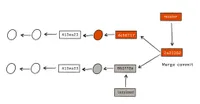
Merge to include
Sometimes the work which has been done in a branch will be thrown away. You delete the branch, and everything is as if the branch never existed. If you don't want to throw away your work, you probably have to bring the contents of your branch into the master branch. That's what merge is for. All commits that have been made in your source branch have to be merged into your master branch.
To merge any branch into your master branch, you have to
git checkout master
git merge <source-branch-name>
The first command will bring you into the master branch; the second command will pull in the changes from the source branch into the master branch. The principle is always the same – make the branch into which you want to merge the working copy and then pull changes from any other branch into your working copy by
git checkout <destination-branch-name>
git merge <source-branch-name>
To be more precise, all commits from your source branch will be merged into your working copy, which is the checked out branch.
The simplest kind of merge is if nothing had been changed in the destination branch while you were working inside of the source branch.
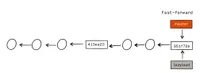
In this case, any changes made in the source branch will entirely be added to the destination branch, which is called fast-forward. The tip (last commit, or head commit) of the destination branch and the tip of the source branch will point to the same commit then, which is the last commit that was made in the source branch. After that, both branches, the source branch and the destination branch, are identical except in their branch names.
A true merge is something different. That's when both, the source branch and the destination branch, have been modified before merging.
A fast-forward then is no longer possible, and Git has to figure out the combined state of the content, which will lead to a so-called merge commit.
Each changed file in each branch is compared. When Git identifies a line that has changed in either branch, that line is carried forward for inclusion in the destination merge.

As long as the branches don't both contain changes to the same line, Git will merge and commit automatically with a generated commit message: Merge branch '<source-branch-name>' into '<destination-branch-name>'.
Unlike a regular commit, which has one parent commit, a merge commit has two parent commits.
Now, when two modified lines of the same file are overlapping during a merge, a merge conflict occurs. Git can not automatically solve this conflict. Instead, Git indicate the conflict in the console
CONFLICT (content): Merge conflict in <conflicting-file-name-in-destination-branch>
Automatic merge failed; fix conflicts and then commit the result.
and put a conflict marker into the file of the destination branch, indicating the conflicting lines.
<<<<<<< HEAD
  <conflicting content line in destination-branch (the current working copy)>
=======
  <conflicting content line in source-branch>

>>>>>>> <destination-branch-name>
To resolve the conflict, this entire section, including the angle brackets, needs to be edited and refactored into the final version you want to see in the file. After that, you can commit the merge with commit -am "your merge commit message".
Remove or rename a branch
Sometimes you want to remove a branch, e.g., after all work is done and the branch has been merged into the master. In order to go ahead, use git branch -d <branch-to-delete> to remove your local branch. To remove a remote branch (refer to Working with remotes to share with a team), use git push origin --delete <branch-to-delete>.
A rename of the current local branch can be achieved by git branch -m <new-branch-name>.
To have the renamed branch on the server, do
git push origin <new-branch-name>
git push origin --delete <old-branch-name>
the second push with the --delete option will remove the old branch from the remote.
Rewind your work
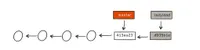
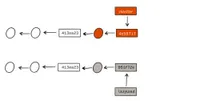
The git checkout can not only be used to checkout an entire branch to drive further the work in this separate branch. git checkout is also a way to go back to the history of your work.
git checkout <commit hash> will set your working directory into the state of the commit referred to with the commit hash (the code you see for each entry in the git log , something like c04ff32). You are working then in the so-called detached HEAD state. Git will inform you about detached HEAD with the following output:
git checkout c04ff32
Note: checking out 'c04ff32'.

You are in 'detached HEAD' state. You can look around, make experimental
changes and commit them, and you can discard any commits you make in this
state without impacting any branches by performing another checkout.

If you want to create a new branch to retain commits you create, you may
do so (now or later) by using -b with the checkout command again. Example:

  git checkout -b <new-branch-name>

HEAD is now at c04ff32... New image for git committing over time
Another way to use git checkout is to use it for files.
git checkout <pathspec> will bring the file which is described by <pathspec> from the head of your current branch back into your working directory. This is useful to revert changes you did on a file while keeping the changes of other files you just modified in your working directory.
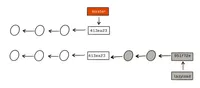
Working with remotes to share with a team
The Git working mode is offline by default. This is nice because you don't need to have an account to sign in somewhere, you can start working with your repository.
A remote in the Git world is a physical copy of a repository. It may be on the same computer as the repository it was copied from (copying is named cloning in Git) or on a different computer far away. The essential part is, you can exchange data between the two repositories and keep them synchronized. Usually, a remote repository is placed on a server which is accessible by your team. Any new teammate initially will clone the repository from the server to his or her local machine. The Git name for this remote repository is usually origin. The origin has nothing special and is not distinct from the local repositories on the machines of each team member, except only by convention it is used as a hub to which the team members connect to synchronize their work with all others. This will happen in a way that team members are working locally on their own computers and eventually sync with the remote repository on the hub server by pulling and pushing committed content.
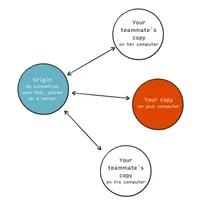
Remote repositories are usually bare repositories, they have no staging area and no working copy like local repositories because no one is working directly on the remote repository. To indicate a bare repository usually .git is being appended to the name of the repository.
A remote may be on GitHub or on a self-hosted system you want to use as a hub.
Clone a remote repository to local
On your local machine move to the folder under which the remote repository should be cloned cd /path/to/parent/. Then clone the remote repository into the parent git clone <repo> [<new-folder-name>].
<new-folder-name> is the optional folder name of the cloned project on your computer.
<repo> is the path to the remote repository and has one of the following structures, each standing for a different protocol:
/path/to/repo.git
ssh://[user@]host.xz[:port]/path/to/repo.git
git://host.xz[:port]/path/to/repo.git
http[s]://host.xz[:port]/path/to/repo.git
The first protocol is the local protocol. This is useful if the remote repository will reside on a shared filesystem to which every team member has access. The other protocols are obviously ssh, git and http. To learn more about these, please refer to "Git on the server – the protocols".
Sometimes you try to access a server via https, and the server is using a self-signed certificate. Git won't accept this certificate but if you are sure about the server, for example, because the server is located in your local intranet, one possible solution is the following configuration in Git:
cd /path/to/your/repo
git config http.sslVerify false
As a global setting for your entire Git: git config --global http.sslVerify false.
Once you have cloned the remote to your computer, Git already configured the origin for your project. You can check that by
cd /path/to/parent/<repo>
git remote -v
which will display the fetch and push addresses being bound to the symbolic name origin.
Push data to remote
If you are working on your local project and committed your changes to a branch you want to bring to the remote repository now; the general Git command format is git push <remote> <remote-branch-name>. This will push the contents of the local branch, your current working copy, into the <remote-branch-name> on the remote repository.
Assuming you worked on a branch named lazyload and are currently on that local branch, your command is git push origin lazyload.
As already mentioned, remote repositories do not have working copies or staging areas and no humans who will resolve merge conflicts. Therefore, if you push to a remote and Git can not merge with a simple fast-forward, Git will reject the push. The situation needs to be fixed by pulling down the changes from the remote and then trying to push again.
The local branch names and the remote branch names are not related in Git. Even though they share the same name, Git doesn't know that they logically represent the same piece of work. Therefore in each push, you have to tell Git to what branch on the remote you want to push. You can configure each local branch of your Git to track its remote counterpart. Once you have done it for a branch, you can push and pull against the remote just by typing git push and git pull without further specifying the remote and remote branch name.
Specify the tracking with git push -u origin lazyload or, generally git push -u <remote> <remote-branch-name>.
-u (alternatively --set-upstream ) is the option which will set up the tracking relationship between your current local branch and the remote branch. You only need to do it once per local branch.
A particular case of pushing is to remove a branch from the remote, as the removing of the local branch doesn't remove the branch on the remote. The command goes git push origin --delete <remote-branch-name>.
Pull data from remote
If you want to get the latest changes, e.g. from the lazyload branch on the remote repository, into your local branch, call git pull origin lazyload or, in general, git pull <remote> <remote-branch-name>.
Git will automatically merge the remote changes into your local branch. In case of a merge conflict, resolve the conflict marker in your local branch, stage, commit your change and push to the remote.
The big picture
Command reference
The following list is by far not complete. Though I found myself using these commands and options most often. For a complete list please refer to git-scm.com/docs/.
Create new local repo
cd /path/to/your/prj/
git init
Copy existing repo
cd /path/to/parent/
git clone <repo> [<new-folder-name>]
Where <repo> is one of
/path/to/repo.git
ssh://[user@]host.xz[:port]/path/to/repo.git
git://host.xz[:port]/path/to/repo.git
http[s]://host.xz[:port]/path/to/repo.git
Watch out
git config [--global] http.sslVerify falseas one possible solution in case Git doesn't allow you to connect to a repo via https.
Status of repo
git statusStage content
git add <pathspec>or
git add --allto un-stage, use
git reset <pathspec>Removing files which have not been staged
git clean [-ifd]Commit content
git commit [-a] [-m "your commit message"]where -a will stage all modified and deleted content and -m indicates the commit message, alternatively
git commit -am "your commit message"See history of commits
git log [--oneline] [--pretty] [<branch-name>]Remove file
git rm <pathspec>Rename file
git mv <current-path> <new-path>Ignore file
Use one pattern per line in .gitignore file
*.a
build/
doc/*.txt
doc/**/*.txt
!doc/todo.txt
See what branch you are on
git branch [-a|-r]Create a branch
git branch <branch-name> [<commit>]or
git checkout -b <branch-name>to create and checkout the branch.
Checkout a branch
git checkout <branch-name>Compare changes
git diff [--stat] [<branch-name or commit>]
git diff <older-commit> <newer-commit>
Merge
git checkout <destination-branch-name>
git merge <source-branch-name>
Rename a branch
git -m <branch-name>Delete a branch
git -d <branch-name>Activate an older commit
git checkout <commit-hash>Discard file changes
git checkout <pathspec>Push to server
git push [-u] <remote> <remote-branch-name>to push from current branch to remote branch, where -u can be used once to track the remote branch from the current branch. After setting the upstream with -u, it can be pushed and pulled from the current branch without specifying <remote> and <remote-branch-name>.
Pull from server
git pull <remote> <remote-branch-name>to pull from remote branch into current branch. If remote branch tracking has been activated before via -u in a git push, it can be pulled from the remote branch without specifying <remote> and <remote-branch-name>.
Tell Git who you are
git config [--global] user.name ["your name or user name"]
git config [--global] user.email ["your email address"]
Display your Git config
git config --listEdit your Git config file
git config [--global] --editConfigure your editor
Set your editor
git config --global core.editor <editor-name>Display your current editor setting
git config core.editorLet Git accept your self-signed certificate
git config [--global] http.sslVerify falseReferences
- [Atlassian Git]
- "Getting Git Right, " Altassian Git Tutorial, atlassian.com/git
- [Bash Git Completion]
- "Install Bash Git Completion, " github.com/bobthecow/git-flow-completion/wiki/Install-Bash-git-completion
- [Beams 2014]
- C. Beams, "How to Write a Git Commit Message, " 2014, chris.beams.io/posts/git-commit
- [Caching Your Git Password]
- "Caching your GitHub password in Git, " help.github.com/articles/caching-your-github-password-in-git/
- [Chacon, Straub 2014]
- S. Chacon, B. Straub, "Pro Git, " 2014, git-scm.com/book
- [Cheat Sheet]
- "Git Cheat Sheet, " www.git-tower.com/blog/git-cheat-sheet/
- [Demaree 2016]
- D. Demaree, “Git for Humans”, A Book Apart, 2016, abookapart.com/products/git-for-humans
- [GitHub]
- "Welcome home, developers, " github.com
- [GitHub Desktop]
- "Simple collaboration from your desktop, " desktop.github.com
- [GitRef]
- Git command reference, git-scm.com/docs/
- [Git]
- Git downloads for different platforms, git-scm.com/downloads
- [Learn]
- "Learn Git & Version Control, " www.git-tower.com/learn/
- [Tower]
- Version control with Git – made easy, In a beautiful, efficient, and powerful app, git-tower.com
- [Westby 2014]
- E. J. Westby, "Dealing with Emergencies in Git, " 2014 24ways.org/2014/dealing-with-emergencies-in-git/