Over the weekend my homepage received a new domain. While the old address ulf.codes is still functioning, the new address is ulfschneider.io.
This didn't start as a domain change. At first I only wanted to make my site faster by delegating the DNS from Strato to Netlify. My site is a Jamstack site hosted by Netlify and therefore letting them manage the DNS will make any site much faster in most cases. That's because when someone wants to navigate to your website, Netlify knows from what area of the world your visitor is coming and they will leverage their Content Delivery Network (CDN) to serve your website from a datacenter nearest to your visitor. The impact is drastic. In my case, and in the environment I was measuring, page load time improved from 1.2 s down to 0.6 s – all free of cost and without changing anything with the build process of my site.
While I was working with name servers and DNS settings, I found the ulfschneider.io domain was available and I immediately reserved it with the idea of changing the primary domain for my website to ulfschneider.io over the weekend – of course while keeping the site functioning for everyone who is used to the old address ulf.codes.
Here are a some quick notes of how both changes were accomplished, the DNS change as well as the primary domain change.
Delegate DNS to Netlify name servers for 🚀 speed
I found the documentation Netlify DNS to be straightforward for doing the job. My domain ulf.codes was registered with Strato, which means from the perspective of Netlify it is an external domain. The Netlify documentation states:
To add a domain you have already registered elsewhere:
- Go to your team’s Domains page and select Add or register domain.
- Enter the domain you wish to add and select Verify.
- You will be asked to confirm that you are the owner of the domain. Select Yes, add domain to create a Netlify DNS zone for the domain.
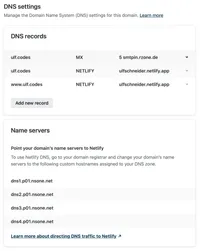
This step will not do any real changes, except creating two entries in your Netlify domain settings of type NETLIFY.
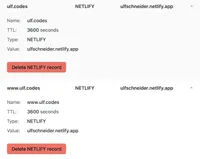
Now you have the option to add DNS records within your Netlify settings. In my case, I have an email address mail@ulf.codes and a mailbox hosted by Strato. Once I delegate my DNS administration from Strato to Netlify that mail address should still be functional. Therefore, before delegating, I had to create an MX DNS record in my Netlify settings to point to the Strato mail server.
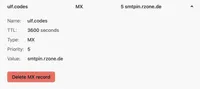
I didn't know the name of my providers mail server, therefore I visited whatsmydns.net/dns-lookup/, entered my domain ulf.codes, clicked Search, and under MX were the values I had to transfer into my Netlify MX configuration.
It was not required for my case to create any more DNS records at Netlify, therefore by then I was ready to delegate my domain from Strato to Netlify. I did that in in the Strato domain administration for ulf.codes by telling Strato to use the four Netlify name servers instead of Strato name servers for the domain lookup. The four Netlify name servers again are listed within your Netlify domain settings.
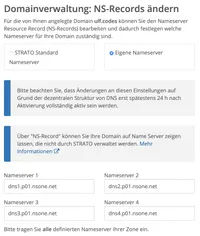
After storing the NS records at Strato, all other Strato settings for the ulf.codes domain were marked as not active by Strato. It can take several hours until the new NS settings are replicated around the world. In my case it took roughly 3 hours. But then my site was on full speed! That's because when you use Netlify name servers Netlify knows from what region of the world a user is requesting your website and they will serve the contents from a datacenter that is closest to your user. The impact is bigger than you might think. Have a look at the current load times for ulf.codes at testmysite.io. I could only achieve that with Netlify. Before using the Netlify name servers a full download of the HTML would take 145 ms in Germany, now its down to 4 ms!
Have an additional domain
Letting your Netlify site run under multiple domains is possible. Again, the Netlify documentation Sites with multiple domains is an excellent resource. Basically, you will
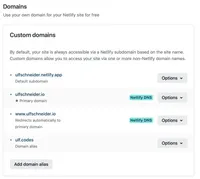
… add a domain alias in your site settings under Domain management > Domains > Custom domains. Select Add domain alias, and follow the process for assigning a domain to your site.
The process of assigning a domain to your site means delegating the DNS to Netlify. It's the exact same process as already described before.
I added my new domain ulfschneider.io by following the already familiar steps. Once the new domain was working I created a redirect rule, so that every user visiting the site with the address ulf.codes will be redirected to ulfschneider.io. The redirect for the Netlify website is configured by creating a file named _redirects that must end up in the root directory of the deployed website. The contents of the _redirects file in my case are:
https://ulf.codes/* https://ulfschneider.io/:splat 301!
http://ulf.codes/* https://ulfschneider.io/:splat 301!
Read that as: Any URL for ulf.codes (http and https) will be redirected to https://ulfschneider.io by using the same URL path. The URL in the users browser will change to the new URL.
The asterisk in the above syntax indicates a splat that will match anything that follows it. The redirect status code that is send to the user is 301 (which means permanent redirect and not temporary redirect). The exclamation mark is required to enforce redirection because otherwise Netlify would see the requested resource is available under the old URL and would not send a redirect code but respond from the old URL to save time.
Finally I made the new apex domain ulfschneider.io to be the primary domain. For Netlify it means that the address www.ulfschneider.io will automatically be redirected to ulfschneider.io. The change is super-quick: In the site settings under Domain management > Domains > Custom domains click on Options for your desired new primary domain and choose Set as primary domain. That's it.
Conclusion
I'm not an infrastructure guy nor a network person, but doing the changes with the help of the Netlify user interface felt straightforward to me. Overall, a quick change that turned into the desired results of improved speed and a new domain – within half a day.